Git and GitHub guide
Git is a program that keeps track of every version of the files in a folder: what changed, when, and why. GitHub is a website that stores a copy of that history online, so you can back it up, move it between computers, share it, and turn in homework. In this class you will use both every week.
This guide goes from one-time setup to everyday commands, with copy-and-paste recipes for the common tasks.
Contents
- How the pieces fit together
- One-time setup
- Logging in: SSH keys, tokens, and gh
- The basic idea: edit, add, commit, push
- Recipes - clone homework, start a new project, work on two computers
- Seeing what is going on
- What not to commit: .gitignore
- Undoing things
- Branches and pull requests
- When two changes collide: merge conflicts
- Beyond storing code: what else GitHub offers - Actions, CI, Pages, and more
- Personal accounts and organizations
- Cheat sheet
- Learn more
How the pieces fit together
A repository (“repo”) is a folder whose history git is tracking. The history lives in a hidden .git folder inside it. You usually have a copy of the repository on GitHub and one or more copies on the computers where you work:
                        +---------------------------+
                        |          GitHub           |
                        |  github.com/YOU/project   |
                        +---------------------------+
                         ^    |               |    ^
              git push   |    | git clone     |    |  git push
                         |    | git pull      |    |
                         |    v               v    |
            +-------------------------+   +-------------------------+
            |       your laptop       |   |   HPCC cluster          |
            |  ~/project/             |   |  ~/bigdata/project/     |
            |    .git/  (history)     |   |    .git/  (history)     |
            |    README.md            |   |    README.md            |
            |    analysis.py          |   |    analysis.py          |
            +-------------------------+   +-------------------------+
git clonemakes a new local copy of a GitHub repository (once per computer).git commitsaves a snapshot in your local copy only.git pushsends your new commits up to GitHub.git pullbrings down commits that were pushed from somewhere else.
Every copy has the full history, so you can work offline and push later.
One-time setup
Do this once on each computer you use (your laptop and the cluster). Git is already installed on the cluster and on Macs (run git --version; a Mac may offer to install the developer tools). On Windows install Git for Windows, which includes Git Bash.
Tell git who you are. This name and email are recorded in every commit you make. Use the email address that is on your GitHub account:
git config --global user.name "Your Name"
git config --global user.email "yourname@ucr.edu"
git config --global init.defaultBranch main    # call the first branch "main"
git config --global core.editor nano           # editor for commit messages (optional)
git config --global --list                     # check your settings
user.name=Your Name
user.email=yourname@ucr.edu
init.defaultbranch=main
core.editor=nano
Logging in: SSH keys, tokens, and gh
GitHub needs to know it’s you when you push (and when you clone a private repository). Your GitHub password does not work on the command line. Use one of these three methods instead:
| SSH key | Personal access token (PAT) | GitHub CLI (gh auth login) | |
|---|---|---|---|
| What it is | A key pair; the public half is added to your GitHub account | A long random password you create on github.com | A program that logs you in through your web browser and stores a token for you |
| Repository URLs look like | git@github.com:YOU/project.git | https://github.com/YOU/project.git | either (you choose SSH or HTTPS) |
| Set up once per | computer | token (they expire) | computer |
| Best for | the cluster, and anywhere you already use SSH | automated scripts; a fallback when nothing else works | your laptop; easiest to set up |
| Watch out for | the private key must stay secret | treat it like a password; set an expiration; never put it in a file you commit | must be installed; the stored token can be revoked on github.com |
Recommendation for this class: on your laptop, install gh and run gh auth login. On the cluster, make an SSH key on the cluster and add it to GitHub (see below). Both are one-time setups.
Option 1: SSH keys
See the SSH keys guide for the full explanation with diagrams. In short, on the computer you want to push from:
ssh-keygen -t ed25519 -C "yourname@ucr.edu"   # press Enter, pick a passphrase
cat ~/.ssh/id_ed25519.pub                     # copy the one line this prints
Paste that line into github.com -> your picture -> Settings -> SSH and GPG keys -> New SSH key. Test it:
ssh -T git@github.com
Hi YOURGITHUBID! You've successfully authenticated, but GitHub does not provide shell access.
Then use the SSH URL when you clone (the green Code button on GitHub -> SSH tab):
git clone git@github.com:YOURGITHUBID/project.git
Option 2: GitHub CLI (gh)
gh is GitHub’s command line tool. It can log you in, and it also creates repositories, opens pull requests, and more, without going to the website.
Install it: on a Mac brew install gh; on Windows winget install --id GitHub.cli; on Linux or the cluster see the install instructions (on the cluster, check module avail gh, or install it into a conda environment with conda install -c conda-forge gh).
gh auth login
Answer the questions: GitHub.com, your preferred protocol (HTTPS is simplest with gh; choose SSH if you already set up a key), and Login with a web browser. It shows a one-time code; paste it into the web page that opens. On the cluster there is no browser, so it prints a web address to open on your laptop instead.
gh auth status        # check that you are logged in
gh auth setup-git     # let plain git commands use gh's login for https URLs
Once you are logged in, gh can also upload an SSH public key for you: gh ssh-key add ~/.ssh/id_ed25519.pub --title "HPCC cluster".
Option 3: Personal access tokens
If you clone with an https:// URL and haven’t set up gh, git push asks for a username and password. Your GitHub password will be refused; you need a token instead:
- github.com -> your picture -> Settings -> Developer settings -> Personal access tokens.
- Choose Fine-grained tokens (preferred: can be limited to specific repositories) or Tokens (classic) (the
reposcope is needed for private repositories). - Set an expiration date, generate it, and copy it right away (GitHub shows it only once).
- When
git pushasks for a password, paste the token.
To avoid pasting it every time, let git remember it: git config --global credential.helper "cache --timeout=28800" keeps it in memory for 8 hours (works on the cluster, nothing saved to disk), or save it permanently (git config --global credential.helper osxkeychain on a Mac, store on Linux, which saves it in a plain text file - acceptable on your own account, but gh or SSH is better). Never write a token into a script or any file in a repository.
Which URL is my repository using?
git remote -v
origin  git@github.com:YOURGITHUBID/project.git (fetch)
origin  git@github.com:YOURGITHUBID/project.git (push)
To switch an existing clone from HTTPS to SSH:
git remote set-url origin git@github.com:YOURGITHUBID/project.git
The basic idea: edit, add, commit, push
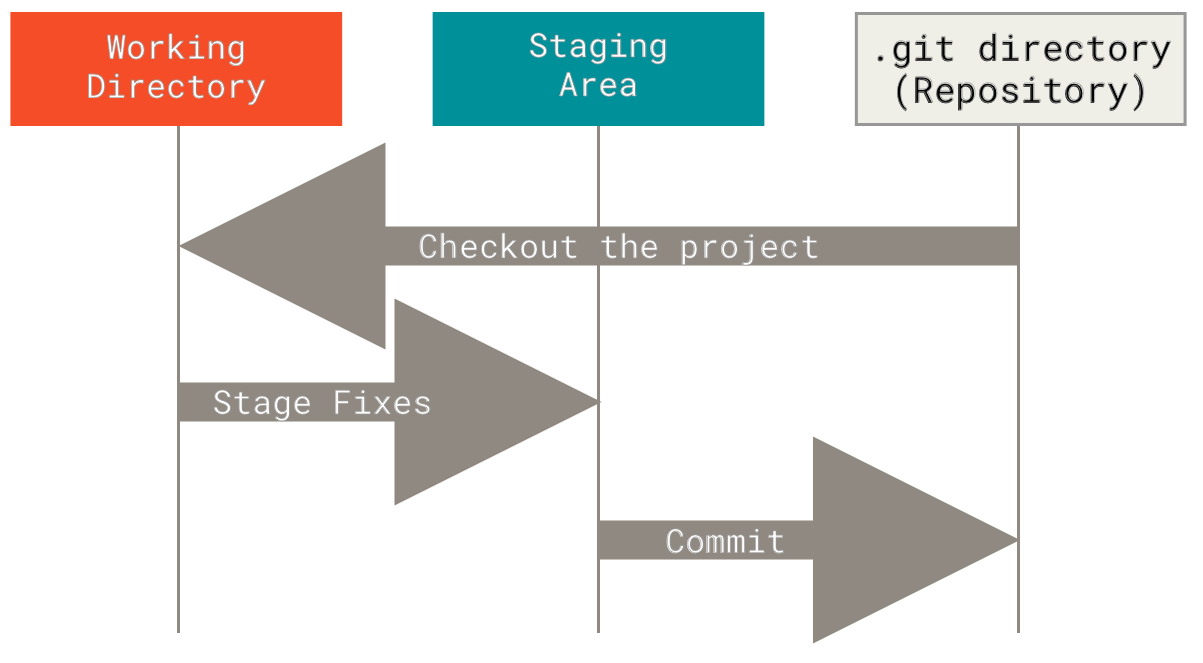
Git has three places a change can be. You edit files in your working directory. git add puts the changes you want into the staging area (a “draft” of the next snapshot). git commit saves the staged changes permanently in the repository history (the .git folder).
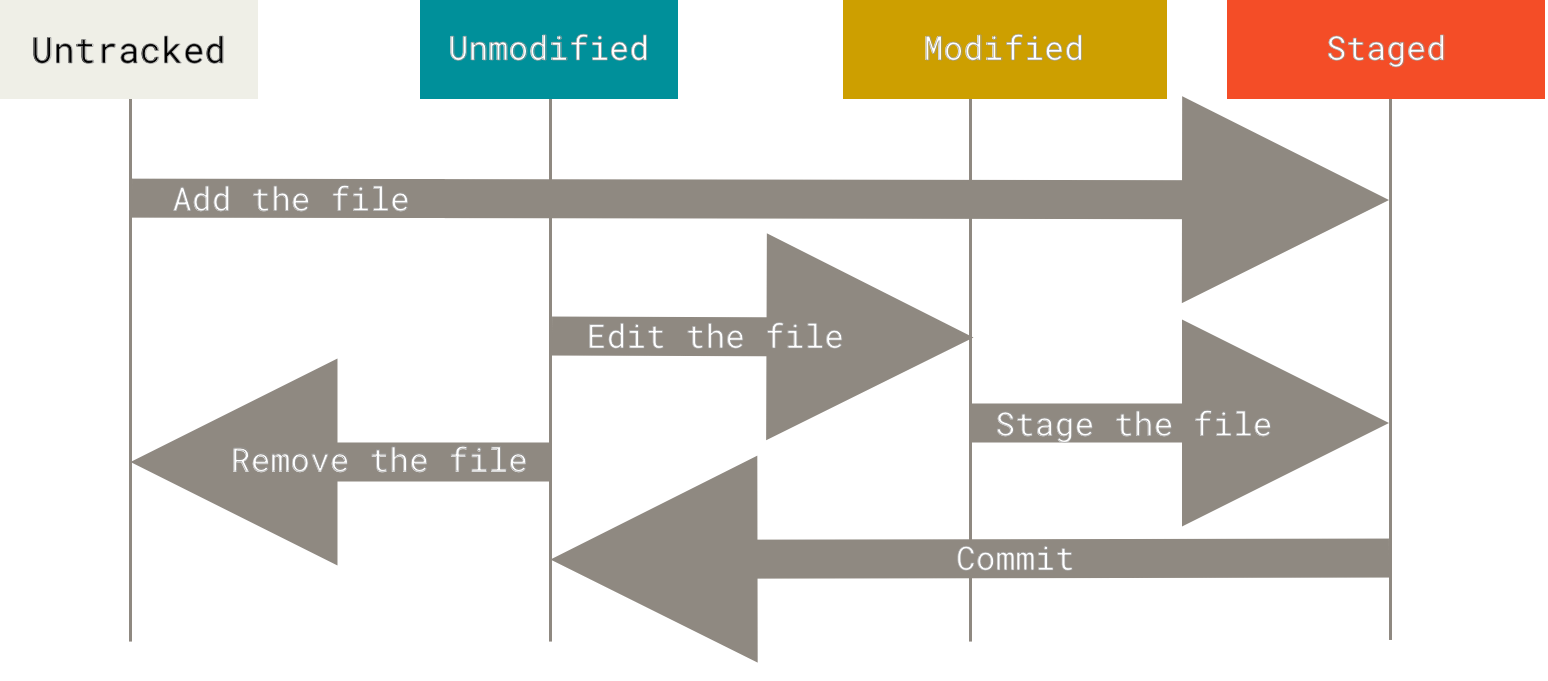
Each file moves through these states as you work:
Figures from Pro Git by Scott Chacon and Ben Straub, CC BY-NC-SA 3.0.
The everyday loop is:
git pull                       # 1. get any changes made elsewhere (skip for a brand new repo)
nano analysis.py               # 2. edit files
git status                     # 3. see what changed
git add analysis.py            # 4. stage the changes you want to save
git commit -m "Count exons per gene"   # 5. save a snapshot with a message
git push                       # 6. send it to GitHub
Write commit messages that say what and why (“Fix off-by-one error in exon lengths”), not “update” or “stuff”. Commit small, related changes often - it makes it easy to find and undo mistakes.
Recipes
Recipe A: get your homework repository (GitHub Classroom)
- Click the assignment link from Canvas and Accept it. GitHub Classroom creates a repository for you, e.g.
biodataprog/2026-hw1-YOURGITHUBID. The first time, Classroom asks you to pick your name from the class roster - this links your GitHub account to your UCR identity so the instructor knows whose homework is whose. Pick carefully, and ask the instructor if your name is missing. - On that repository’s page click the green Code button and copy the URL (SSH tab if you set up a key, otherwise HTTPS).
- Clone it where you want to work:
cd ~/bigdata/gen220        # on the cluster, for example
git clone git@github.com:biodataprog/2026-hw1-YOURGITHUBID.git
cd 2026-hw1-YOURGITHUBID
ls
- Work, then add, commit and push. Your last push before the deadline is what gets graded, so check the repository page on GitHub to be sure your files are there.
git add filesize.sh
git commit -m "Homework 1: file size script"
git push
With gh you can clone by name: gh repo clone biodataprog/2026-hw1-YOURGITHUBID.
Recipe B: turn a folder on your computer into a GitHub repository
You already have (or are starting) a project folder, and want it on GitHub.
mkdir gen220-practice && cd gen220-practice     # or cd into your existing folder
git init
Initialized empty Git repository in /home/you/gen220-practice/.git/
Add some files and make the first commit:
echo "# GEN220 practice" > README.md
printf '#!/usr/bin/env bash\necho "hello"\n' > hello.sh
git status
On branch main

No commits yet

Untracked files:
  (use "git add <file>..." to include in what will be committed)
	README.md
	hello.sh

nothing added to commit but untracked files present (use "git add" to track)
git add README.md hello.sh
git commit -m "First commit: README and hello script"
[main (root-commit) 85a91c8] First commit: README and hello script
 2 files changed, 3 insertions(+)
 create mode 100644 README.md
 create mode 100644 hello.sh
Now create the GitHub copy and connect the two. The easy way, with gh (one command creates the repository on GitHub, adds it as the origin remote, and pushes):
gh repo create gen220-practice --private --source=. --remote=origin --push
Or on the website: click + (top right) -> New repository, name it gen220-practice, and don’t tick “Add a README” (you already have commits). GitHub then shows the commands to connect it:
git remote add origin git@github.com:YOURGITHUBID/gen220-practice.git
git push -u origin main      # -u: remember origin/main, so later just "git push"
Recipe C: start on GitHub, then clone
Create the repository first (with a README, a .gitignore template, and a license), then clone it:
gh repo create gen220-project --public --add-readme --gitignore Python --license mit --clone
cd gen220-project
Or make it on the website with Add a README file ticked, then git clone its URL.
Recipe D: work on the same repository from your laptop and the cluster
Clone it once on each computer. Then follow one rule: pull before you start, push when you stop.
# on the cluster, start of a session
cd ~/bigdata/gen220/gen220-project
git pull
# ... work ...
git add -A          # stage everything that changed (check git status first!)
git commit -m "Run BLAST on all samples"
git push

# later, on your laptop
git pull            # now you have the cluster's changes
If you forget and both copies have new commits, git push is refused:
 ! [rejected]        main -> main (fetch first)
hint: Updates were rejected because the remote contains work that you do not
hint: have locally. This is usually caused by another repository pushing to
hint: the same ref. If you want to integrate the remote changes, use
hint: 'git pull' before pushing again.
Run git pull, then git push again. If you edited the same lines in both places, see merge conflicts.
Seeing what is going on
git status is the command to run whenever you are unsure. It tells you which branch you are on and which files are changed, staged, or untracked, and usually suggests what to do next. git status --short is a compact version:
 M hello.sh
?? notes.txt
(M = modified, ?? = untracked, A = newly added.)
git diff shows exactly what changed (lines starting with + were added, - removed). Use git diff --staged to see what you’ve already staged.
git diff
diff --git a/hello.sh b/hello.sh
index c0d7ba9..b05df65 100644
--- a/hello.sh
+++ b/hello.sh
@@ -1,2 +1,3 @@
 #!/usr/bin/env bash
 echo "hello"
+echo "goodbye"
git log lists the commits, newest first:
git log --oneline
9ac88eb Say goodbye too
85a91c8 First commit: README and hello script
The short codes (9ac88eb) identify commits; you can use them in other commands, e.g. git show 85a91c8. On GitHub, the History or commits link on a repository shows the same thing.
What not to commit: .gitignore
Git is for code, documentation, and small files. Don’t commit:
- large data (FASTQ, BAM, genomes, big tables) - GitHub refuses files over 100 MB and repositories should stay small. Keep data in
~/bigdata, and commit the script that downloads or makes it. - results that your scripts can regenerate
- passwords, tokens, or private keys
- system clutter (
.DS_Store,__pycache__/)
List patterns to ignore in a file called .gitignore in the top folder of the repository:
# data and large outputs
data/
*.fastq.gz
*.bam
# clutter
.DS_Store
__pycache__/
Ignored files no longer show up in git status, and git add -A skips them. Commit the .gitignore file itself. GitHub has ready-made templates (e.g. for Python and R).
If you committed a big file by accident and haven’t pushed yet, git rm --cached bigfile.bam stops tracking it (the file stays on disk), then add it to .gitignore and commit.
Undoing things
| I want to… | Command |
|---|---|
| throw away my edits to a file since the last commit | git restore file.py (careful: the edits are gone) |
un-stage a file I git add-ed (keep the edits) | git restore --staged file.py |
| fix the message of, or add a forgotten file to, my last commit before pushing | git add forgotten.py then git commit --amend |
| undo a commit that is already pushed | git revert COMMITID (makes a new commit that reverses it) |
| see an old version of a file | git show COMMITID:file.py |
| get an old version of a file back | git restore --source COMMITID file.py |
git revert is safe for shared repositories because it adds to the history rather than rewriting it:
git revert --no-edit HEAD~1      # HEAD = latest commit; HEAD~1 = the one before it
git log --oneline
d8a5c5e Revert "Say goodbye too"
0a1cc48 Ignore data files
9ac88eb Say goodbye too
Avoid commands you find online that “rewrite history” (git reset --hard, git push --force) until you understand them; they can permanently delete work.
Branches and pull requests
A branch is a separate line of development. You can try an idea on a branch without disturbing the working version on main, then merge it in when it works.
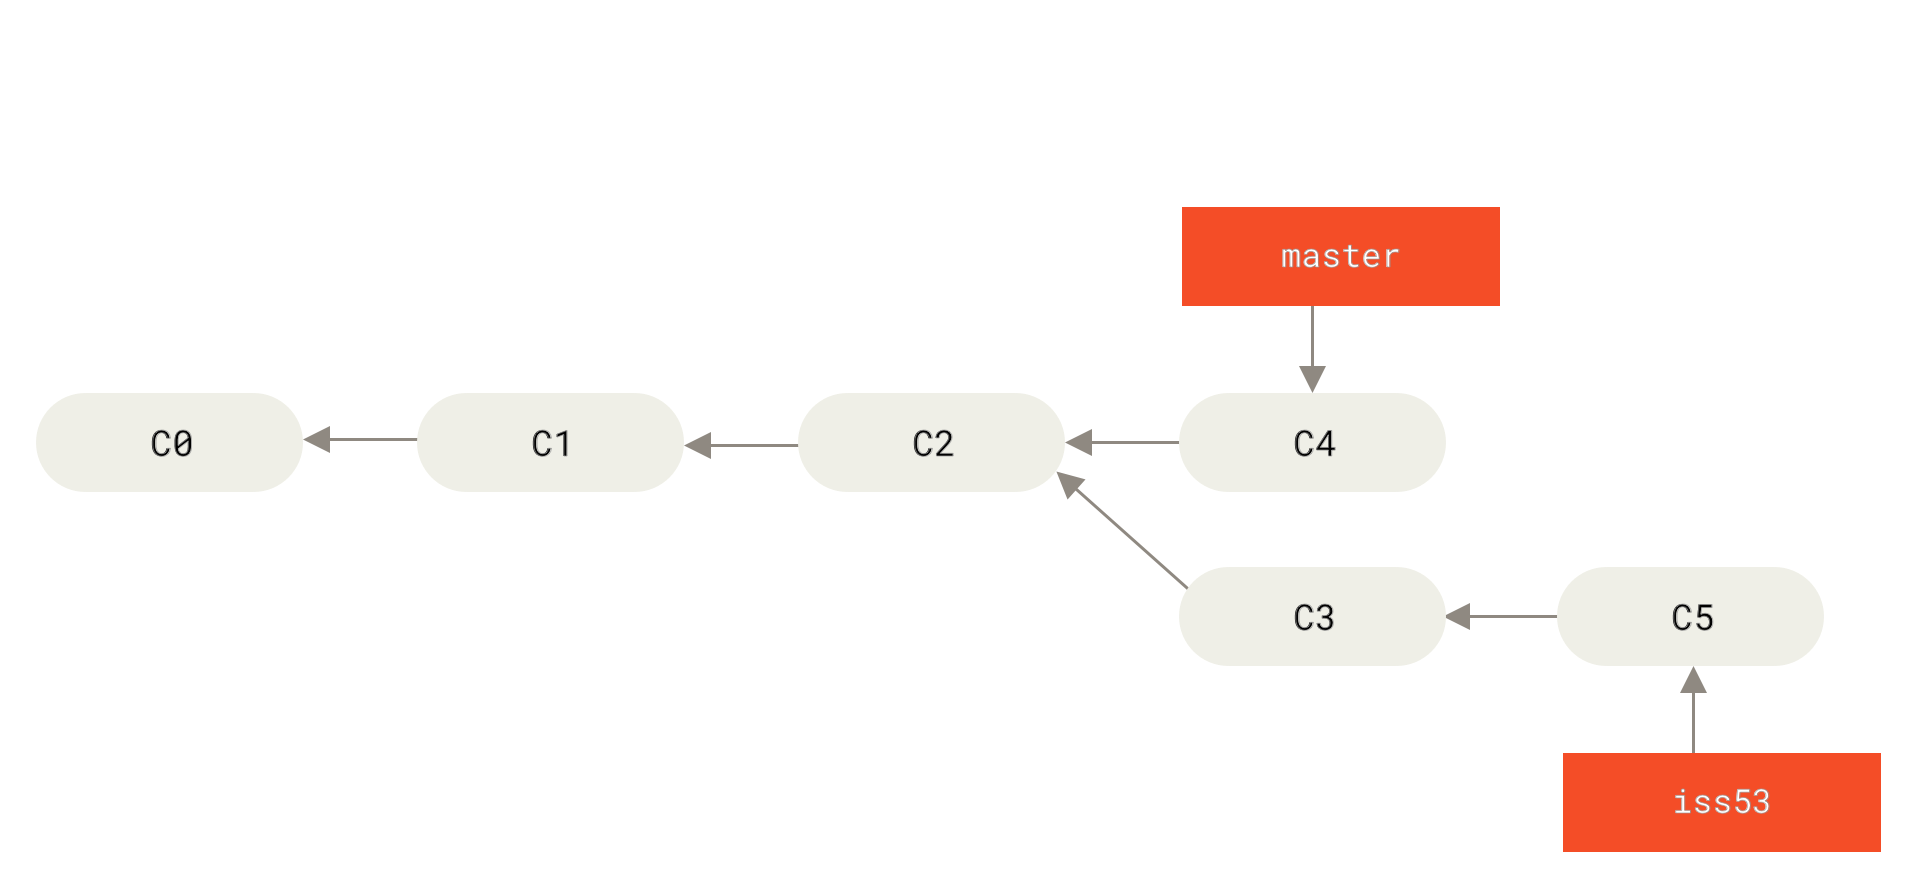
Commits C3 and C5 were made on a branch (iss53) while C4 was added to the main line (called master in older repositories, main today). Figure from Pro Git, CC BY-NC-SA 3.0.
git switch -c add-analysis        # create a new branch and switch to it
# ... edit, add, commit as usual ...
git switch main                   # go back to main
git merge add-analysis            # bring the branch's commits into main
git branch -d add-analysis        # delete the branch once merged
Updating d8a5c5e..ba625c3
Fast-forward
 count.sh | 1 +
Deleted branch add-analysis (was ba625c3).
On GitHub, teams usually merge through a pull request (PR): push the branch, open a PR, let a partner review it, then merge it on the website. This is a good way to work on your class project with your team:
git switch -c add-plots
# ... edit, add, commit ...
git push -u origin add-plots
gh pr create --fill               # open a pull request using the commit message(s)
gh pr list                        # see open pull requests
gh pr merge                       # merge it (or click "Merge" on the website)
When two changes collide: merge conflicts
If two commits change the same lines of a file, git can’t decide which to keep. git pull (or git merge) stops and marks the file:
Auto-merging README.md
CONFLICT (content): Merge conflict in README.md
Automatic merge failed; fix conflicts and then commit the result.
# GEN220 practice
<<<<<<< HEAD
line from first copy
=======
line from clone2
>>>>>>> a7febb6c410e8b07c05c45117003978328dcb5af
The part between <<<<<<< and ======= is your version; between ======= and >>>>>>> is the incoming one. To fix it:
- Open the file, keep what you want (one side, the other, or a combination), and delete the marker lines.
- Save, then mark it resolved and finish the merge:
git add README.md
git commit -m "Merge changes from the cluster"
git push
Conflicts are normal and not dangerous. Pulling often and committing small changes makes them rare. git merge --abort gives up and returns to how things were before the merge.
Beyond storing code: what else GitHub offers
A GitHub repository is more than a backup. The tabs along the top of every repository page give you:
| Feature | What it does | Where you’ll see it in this class |
|---|---|---|
| Issues | a to-do list and discussion thread for a repository: bug reports, questions, tasks, with labels and assignees | keep track of tasks for your team project |
| Pull requests | propose, review, and discuss changes before merging them (see above) | team projects |
| Actions | run scripts automatically on GitHub’s computers when something happens (a push, a pull request, a schedule) | this course website is built and published by an Action |
| Pages | free web hosting for a website stored in a repository | Homework 6 |
| Projects | a planning board (columns like To do / Doing / Done) built from issues | optional, for team projects |
| Releases | a named, downloadable snapshot of the code (e.g. “v1.0” for a paper) | archive your project; connect to Zenodo to get a DOI you can cite |
| Codespaces | a full VS Code editor and Linux terminal in your web browser, for any repository | work from a tablet or a computer without software installed |
| Wiki / Discussions | documentation pages and a forum attached to a repository | used by many bioinformatics tools for help |
As a student, apply for the free GitHub Student Developer Pack (GitHub Education). It includes GitHub Pro, more free Codespaces and Actions time, and GitHub Copilot.
GitHub Actions: workflows and continuous integration
A workflow is a YAML text file in the folder .github/workflows/ of a repository. It lists when to run (on:) and what to run (jobs: made of steps:). GitHub starts a fresh virtual computer, runs the steps, and shows the result (a green check or a red X) next to each commit, on pull requests, and under the repository’s Actions tab.
Continuous integration (CI) means automatically running your tests every time code changes, so you find out right away when something breaks - even when a teammate made the change. Here is a complete example. The repository has a small function and a test file:
gc-tools/
|-- gc_content.py
|-- tests/
|   `-- test_gc_content.py
`-- .github/
    `-- workflows/
        `-- tests.yml
gc_content.py:
def gc_content(seq):
    """Return the fraction of G and C bases in a DNA sequence."""
    seq = seq.upper()
    if len(seq) == 0:
        return 0.0
    return (seq.count("G") + seq.count("C")) / len(seq)
tests/test_gc_content.py - pytest runs every function whose name starts with test_, and each assert must be true:
from gc_content import gc_content

def test_all_gc():
    assert gc_content("GCGC") == 1.0

def test_half():
    assert gc_content("atgc") == 0.5

def test_empty():
    assert gc_content("") == 0.0
Run the tests yourself first (pip install pytest):
python -m pytest
...                                                                      [100%]
3 passed in 0.01s
.github/workflows/tests.yml - run the same tests on GitHub on every push and pull request:
name: Run tests

on: [push, pull_request]

jobs:
  test:
    runs-on: ubuntu-latest
    steps:
      - uses: actions/checkout@v7          # get a copy of the repository
      - uses: actions/setup-python@v7      # install Python
        with:
          python-version: "3.13"
      - run: pip install pytest
      - run: python -m pytest
Commit and push the workflow file, then open the Actions tab to watch it run. uses: lines run ready-made actions shared by others (browse the Actions Marketplace); run: lines are ordinary shell commands. Other common uses: check code style, build documentation or a website, rebuild a figure from data, or run a small test version of a pipeline.
Actions are free for public repositories; private repositories get a monthly allowance of free minutes. See GitHub Actions: Quickstart and Building and testing Python.
GitHub Pages: free web hosting
GitHub Pages publishes a website straight from a repository. Write pages in Markdown (or HTML), push them, and GitHub builds the site with Jekyll and serves it at:
https://YOURGITHUBID.github.io/for a repository namedYOURGITHUBID.github.io(a personal or lab home page), orhttps://YOURGITHUBID.github.io/REPONAME/for any other repository (a project, tool, or course site).
You turn it on under the repository’s Settings -> Pages, either publishing a branch directly or through an Actions workflow. This course site is an example: its Markdown files are in github.com/biodataprog/GEN220_2026, and a workflow builds and publishes it to biodataprog.github.io on every push. Homework 6 walks you through making your own site, and the Building Websites notes have lab website templates.
Personal accounts and organizations
There are two kinds of GitHub accounts:
- A personal account is you. You log in with it, and repositories you create live under your name:
github.com/YOURGITHUBID/project. Keep one account for your whole career, and add your UCR email to it (you can have several emails on one account). - An organization is a shared space for a group - a lab, a course, a project, a company. Nobody logs in as an organization; personal accounts are added to it as members, and it owns repositories:
github.com/biodataprog/GEN220_2026,github.com/stajichlab/....
| Personal account | Organization | |
|---|---|---|
| Who is it | one person | a group of people |
| Log in with it | yes | no - members log in with their personal accounts |
| Repository URLs | github.com/YOU/repo | github.com/ORGNAME/repo |
| Permissions | you own everything; you can add collaborators to individual repositories | owners manage the organization; members and teams get read, write, or admin access per repository |
| Good for | your own code, homework practice, your personal website | lab code and data pipelines that should outlive any one student; courses; shared tools |
Why this matters for you:
- Your homework repositories are created by GitHub Classroom inside the
biodataprogcourse organization, not in your personal account. They are normally private: only you and the instructors can see them. Clone or fork them if you want a copy under your own name after the class. - For your lab’s code, ask whether your lab has an organization. Code in a lab organization stays available to the lab after you graduate; code only in your personal account leaves with you.
- Forking copies someone else’s repository into your account so you can change it; you can then send your changes back with a pull request. This is how most people contribute to open source bioinformatics tools.
- Anyone can create a free organization, and academic labs and courses can request free upgraded plans through GitHub Education.
Cheat sheet
| Task | Command |
|---|---|
| set your name and email (once) | git config --global user.name "Your Name" and user.email |
| copy a repository from GitHub | git clone URL or gh repo clone OWNER/REPO |
| start tracking a folder | git init |
| what changed? | git status, git diff |
| stage changes | git add FILE (or git add -A for everything) |
| save a snapshot | git commit -m "message" |
| send commits to GitHub | git push (first time: git push -u origin main) |
| get commits from GitHub | git pull |
| history | git log --oneline |
| where does this repo push to? | git remote -v |
| create a GitHub repository from this folder | gh repo create NAME --private --source=. --push |
| make and switch to a branch | git switch -c NAME |
| open a pull request | gh pr create --fill |
| check GitHub login | ssh -T git@github.com or gh auth status |
GitHub also publishes a printable Git cheat sheet.
Learn more
Tutorials:
- GitHub Skills - short interactive courses that run inside GitHub (start with “Introduction to GitHub”)
- GitHub Docs: Get started - including About Git and Hello World
- Software Carpentry: Version Control with Git - a full beginner lesson written for scientists
- Learn Git Branching - a visual, interactive game for branches and merging
References:
- Pro Git - the free, complete book about git (source of the figures above)
- GitHub CLI manual - every
ghcommand - GitHub Docs: Authentication - SSH keys, personal access tokens, and more
- GitHub Classroom glossary - what the terms in Classroom mean
- Chapter 5 (“Git for Scientists”) of Vince Buffalo’s Bioinformatics Data Skills, free on the UCR network via O’Reilly